NeoDeos Client SDK
The Client SDK is used to securely collect payment details in the browser.
The Client SDK will seamlessly plug into your existing payment page. When it's initialised, it will securely load an iframe hosted by NeoDeos. The iframe will collect the payment details, which will then be submitted to NeoDeos and converted to a payment token. The payment token will be added as a hidden input to the form. In case of PayPal or Buy Now Pay Later payments the payment details will be converted to a transactionId. The transactionId will be added as a hidden input to the form. Collecting the payment details is triggered when the form is submitted.
You can either install the Client SDK using:
- embedded script
Include via Embedded Script
To include via embedded script:
<!-- Add the script first on your checkout page -->
<script src="https://assets.neodeos.com/v1.0.7/js/neodeos.js"></script>
Begin Integration with Payment UI
The simplest start to this is to use the Payment UI to create an integrated payment UI for most payment options. This will automatically append the payment options into your page in the html element you select.
The Payment UI looks like this:
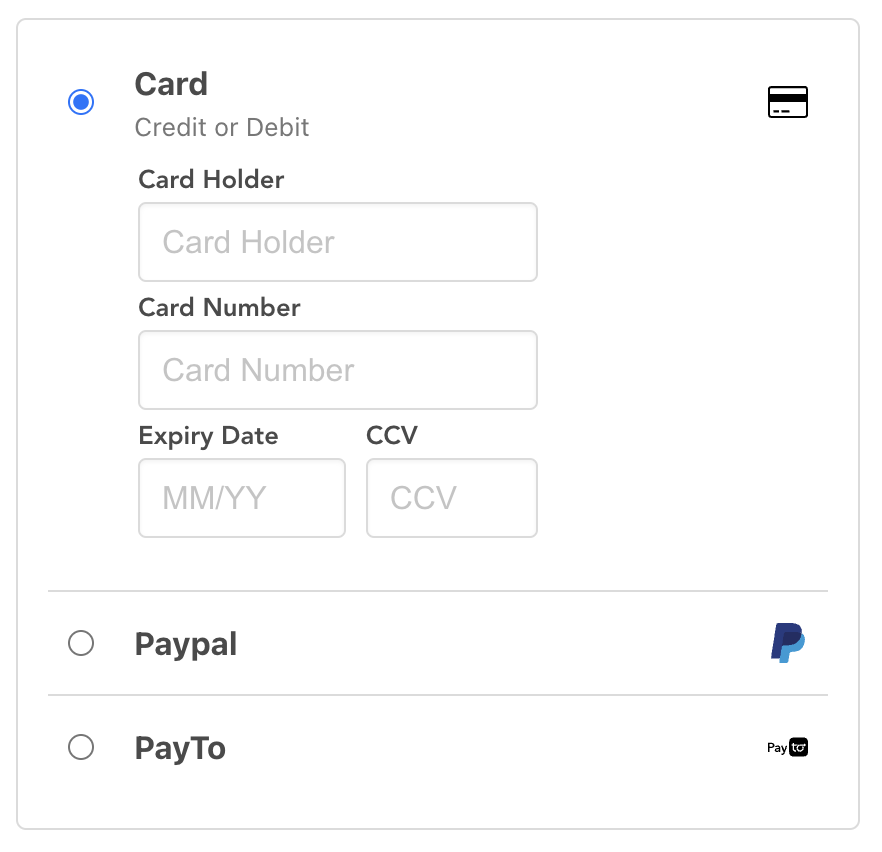
Retrieve your Public Key from the "Account" section in the dashboard — it’s required for initializing the Client SDK. Using the Payment UI will automatically find the best provider for amount and currency.
To create a Payment UI:
<!DOCTYPE html>
<html>
<head>
  <meta charset="utf-8" />
  <meta name="viewport" content="width=device-width, initial-scale=1" />
  <title>NeoDeos Card iframe example</title>

  <script type="text/javascript" src="https://assets.neodeos.com/v1.0.7/js/neodeos.js"></script>
  <script type="text/javascript">
    window.addEventListener('load', function() {
      neodeos.init('sandbox', '<public key>').addPaymentUI('iframeContainer', 20, 'USD');
      // .addPaymentUI('<put the id of the html element here>', <put the payment amount here>, '<put the currency here>');
    });
  </script>
</head>

<body>
<h1>This is a payment page</h1>

<form method="POST" action="/">
  <div id="iframeContainer"></div>

  <div>
    <button type="submit">Submit</button>
  </div>
</form>
</body>
</html>
If there is no PayPal provider in the account, then the PayPal option won't be shown.
Adjust the Payment Total
When the transaction amount on the checkout page is subject to change, it's important to programmatically update the value to allow the system to re-evaluate and select the most cost-efficient provider. This logic can be tied to an onchange event on the pricing input field to ensure real-time recalculation.
// replace 'total' with your amount input
document.getElementById('total').onchange = function () {
  neodeos.setAmount(document.getElementById('total').value);
};
Adapting the Payment UI to Your Needs
You can extend and modify this in a number of ways by passing in an options parameter. None of the options are required and you can mix and match based on your needs.
Selecting a Custom Provider
By default, the best provider will be selected for each payment option. If you want to use a specific provider, you can specify this in the options parameter.
window.addEventListener('load', function () {
  neodeos
    .init('sandbox', '<public key>')
    .addPaymentUI('iframeContainer', 20, 'USD', { cardProviderId: '<Card Provider Id>', paypalProviderId: '<PayPal Provider Id>' });
});
You can specify just one provider, for example if you wanted to use as specific PayPal provider but wanted to automatically select the card provider.
window.addEventListener('load', function () {
  neodeos.init('sandbox', '<public key>')
    .addPaymentUI('iframeContainer', 20, 'USD', { paypalProviderId: '<PayPal Provider Id>' });
});
Activate Pay in 4 via PayPal
To enable PayPal’s Pay in 4 feature, include the additional parameter paypalEnablePayIn4 in your request:
window.addEventListener('load', function () {
  neodeos.init('sandbox', '<public key>')
    .addPaymentUI('iframeContainer', 20, 'USD', { paypalEnablePayIn4: true });
});
Editing PayPal Button Appearance
You can edit the PayPal buttons to change the color of the button by passing an optional parameter (paypalButtonStyle):
window.addEventListener('load', function () {
  neodeos.init('sandbox', '<public key>')
    .addPaymentUI('iframeContainer', 20, 'USD', { paypalButtonStyle: 'blue' });
});
You can set this as either:
- gold
- blue
- silver
- white
- black
The default button color is gold.
Other options can be found on the Configuring the Drop In UI page.
Integrating Standalone Payment Elements
You can also use individual payment components (e.g., just card or just PayPal). You can use each component independently or together to build out your own custom UI.
- Creating a Card component
- Creating a Card Least Cost component
- Creating a PayPal component
- Creating a GooglePay component
Additional Customization Features
You can also extend this in other ways
Success Action
By default, the form is automatically submitted once the payment details have been successfully tokenized. You can override this behavior by defining a custom success handler, which is triggered when tokenization completes. The success payload will contain either a token (for card-based payments) or a transactionId (for PayPal and Buy Now Pay Later methods).
You can add your handler by calling onSuccess():
function myHandler(message) {
  console.log(message);
  // message will contain {token: '<token here>'} or {transactionId: '<transactionId here>'}
}

neodeos.onSuccess(myHandler);
Failure Action
You can add a custom function handler for when payment information fails to be successfully tokenised. The failure message will contain the error message.
You can add your handler by calling onFailure():
function myHandler(message) {
  console.log(message);
  // message will contain { error: '<error message>' }
}

neodeos.onFailure(myHandler);
Initialization Callback
You can add a custom function handler for when payment form is ready.
You can add your handler by calling onLoaded():
function myHandler(message) {
  console.log(message);
  // message will contain { error: '<error message>' }
}

neodeos.onLoaded(myHandler);
Define success message for collecting payment details
You can define a custom success callback that triggers once payment details have been successfully captured. If not specified, the default message displayed is: "Payment details collected."
neodeos.successMessage("Some custom message");
Implementing Logging
If you're running into issues, one option is to switch on more logging to better understand the issue.
You can do this by passing an extra parameter:
window.addEventListener('load', function () {
  neodeos.init('sandbox', '<public key>', true)
    .addPaymentUI('iframeContainer', 20, 'USD');
});
Generate a Payment Token from Card Data
You can tokenise card details without using the Payment UI by calling tokeniseCard().
neodeos.tokeniseCard('<Card Provider Id>', '<card number>', '<expire date>', '<cardholder>', '<ccv>', '<metadata (optional)>', 'options (optional)');
metadata is an optional field that allows you to attach custom key-value data to the request—commonly used to provide gateway-specific information, such as a document ID for certain providers in Latin America,
The options object supports the following optional properties:
createNetworkToken: Enables network tokenization if set totrue. Defaults tofalseverify: Triggers card detail verification whentrueis provided. Defaults to orfalse
You will receive the token in the success handler.
function myHandler(payload) {
  console.log(payload.token);
}

neodeos.onSuccess(myHandler);
Generate a Payment Token with 3DS Validation
You can tokenise card details while performing 3D Secure verification.
neodeos.tokeniseWith3Ds('iframeContainer', '<Card Provider Id>', '<card number>', '<expire date>', '<cardholder>', '<ccv>', '<email>', '<put the payment amount here>', '<put the currency here>', '<metadata (optional)>', '<options (optional)>');
metadata is an optional field that allows you to attach custom key-value data to the request—commonly used to provide gateway-specific information, such as a document ID for certain providers in Latin America,
The options object supports the following optional properties:
requireChallenge: when set totrue, explicitly enforces a 3D Secure challenge during the authentication flow. Defaults tofalsecreateNetworkToken: Enables network tokenization if set totrue.Defaults tofalseverify: Triggers card detail verification whentrueis provided. Defaults tofalse
Trigger 3DS Authentication for a Saved Token
You can perform 3D Secure verification on an existing token.
neodeos.addThreeDsWithToken('<token>', '<email>', '<amount>', '<3-letter currency code>', '<ccv (optional)>', '<options (optional)>');
The options object supports the following optional properties:
requireChallenge: When set totrue, explicitly enforces a 3D Secure challenge during the authentication flow. Defaults tofalse